HT Saddle Splice Instructions
Installation Instructions [PDF]
U.S. Bellows highly recommends that a test splice be performed prior to actual splice.
Thank you for purchasing FLEXXCEL Fabric Expansion Joint material. Prior to performing the actual splice on your expansion joint, please complete a U.S. Bellows Test Splice. Refer to the U.S. Bellows Test Splice instructions for details.
Safety Precautions
Experience has shown fluoropolymers can be processed and used at elevated temperatures without hazard if proper ventilation is used. Make certain all heat sealing is performed in well ventilated areas. Make certain the heat sealer is safely handled during use. The heat sealer temperature will reach 725°F in normal operation. Special care must be taken with the heat sealer during handling due to the high temperature.
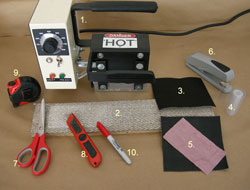
Equipment required to splice FLEXXCEL materials:
- Heat Seal Iron
- Backer Board
- FLEXXCEL belting material
- PFA heat sealing film
- ensureAsplice product
- Stapler*
- Scissors*
- Blade Knife*
- Tape Measurer*
- Marking Pen*
*These items are not included in the kit.
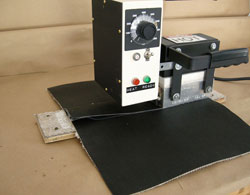
Heat Seal Iron Operation
To operate the Heat Seal Iron, follow these instructions:
- Plug the unit into an electrical outlet.
- Place the Heat Seal Iron on the FLEXXCEL Backer Board or another insulated surface.
- Push the toggle switch up to the “on” position.
- Set the temperature by turning the dial to the desired temperature. A temperature range of 700°-740°F (370°-385°C) is typical for splicing U.S. Bellows FLEXXCEL materials.
- If ambient conditions are ideal, each splice section should take approximately 5 minutes.
The unit contains two lights, a “heat up” light and a “ready” light. The “heat up” light will remain lit until the unit reaches the set temperature, at which point the “ready” light will go on.
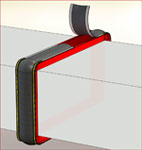
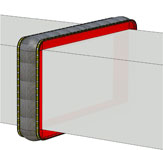
Install the FLEXXCEL HT belt material on the expansion joint frames per the BELT INSTALLATION INSTRUCTIONS. Leave section on top of duct “unbolted” at preferred splice area. Carefully trim FLEXXCEL HT belt material so the two ends “butt up” with each other.
 |
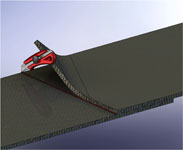 |
Follow Page 1 instructions for iron operating instructions. Cut PFA film and 3″ wide FLEXXCEL material strip to equal the width of the installed belt. Staple the PFA film to the “gas side” of the FLEXXCEL material strip.
Slide the backer board under the splice area. Place the FLEXXCEL material strip over the “trimmed” HT material with the PFA film facing down. Place iron at edge of belt to begin splice. Apply pressure to iron handles during each splice. Each splice section should take approximately 5 minutes.
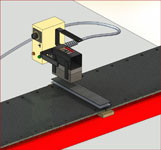
After each section of the splice is complete, rub the completed splice area with a wooden block—or end of a wooden hammer handle. There will be a noticeable change of color on the belt after rubbing. Allow the splice to cool to ambient temperature before further handling the belt. Depending on width of belt, it may be necessary to perform multiple splices across the width of the belt. Step iron across width of belt, overlapping each splice 1/2″.
 |
 |
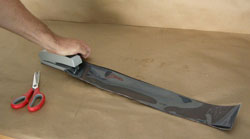
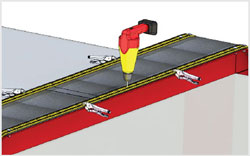
After the belt has sufficiently cooled, clamp the belt and back up bars into place and drill remaining holes in the belt. Bolt the back up bars into place. Expansion joint splice and installation is complete.
 |
 |